Art has always been a powerful medium for expressing creativity, and skeleton hand drawing is one of the most fascinating techniques that can elevate your artistic skills. Whether you're a professional artist or just starting your creative journey, understanding the anatomy of the human hand is essential for producing realistic and detailed drawings. In this article, we will explore the intricacies of skeleton hand drawing, from basic anatomy to advanced techniques.
Artists who specialize in skeleton hand drawing often find themselves delving into the complexities of human anatomy. This technique requires a deep understanding of the skeletal structure of the hand, which consists of 27 bones. By mastering the fundamentals of skeletal anatomy, artists can create drawings that not only look realistic but also convey emotion and movement.
This article will serve as your ultimate guide to skeleton hand drawing. We will cover everything from the basics of hand anatomy to advanced tips for improving your drawing skills. Whether you're looking to enhance your portfolio or simply want to learn more about this fascinating art form, this article has something for everyone.
Read also:Lady Glitter Sparkles A Radiant Journey Into The World Of Glamour And Style
Table of Contents
- Understanding the Anatomy of the Hand
- Essential Tools for Skeleton Hand Drawing
- Basic Techniques for Drawing Skeleton Hands
- Adding Details to Your Skeleton Hand Drawings
- Practice Exercises to Improve Your Skills
- Exploring Different Styles of Skeleton Hand Drawing
- Advanced Tips for Realistic Drawings
- Common Mistakes to Avoid
- Using Software for Digital Skeleton Hand Drawing
- Finding Inspiration for Your Art
Understanding the Anatomy of the Hand
The Skeletal Structure of the Hand
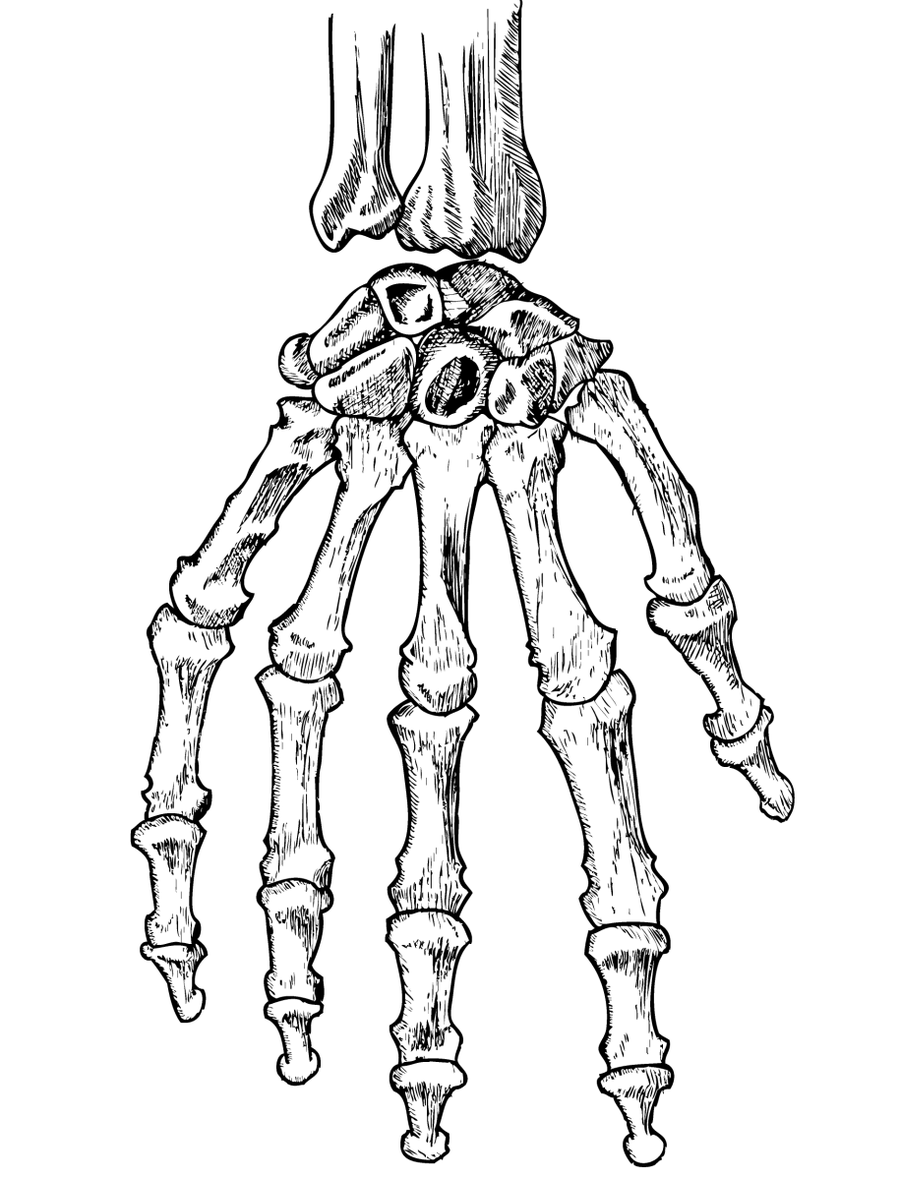
The human hand is a complex structure consisting of 27 bones, which are divided into three main groups: the carpals, metacarpals, and phalanges. The carpals are the eight small bones located in the wrist, while the metacarpals form the palm of the hand. The phalanges are the bones of the fingers, with each finger having three phalanges (proximal, middle, and distal), except for the thumb, which has only two.
Key Features of the Skeleton Hand
When drawing skeleton hands, it's important to focus on the following key features:
- Carpals: These small bones give the wrist its flexibility and range of motion.
- Metacarpals: These bones form the foundation of the palm and provide support for the hand.
- Phalanges: These bones make up the fingers and are responsible for the hand's ability to grasp and manipulate objects.
Essential Tools for Skeleton Hand Drawing
To create realistic skeleton hand drawings, you'll need the right tools. Here's a list of essential items:
- Pencils of varying hardness (2H, HB, 2B)
- High-quality sketchbook or drawing paper
- Eraser (kneaded and standard)
- Blending tools (tortillons, blending stumps)
- Reference images of skeleton hands
Basic Techniques for Drawing Skeleton Hands
Step-by-Step Guide to Drawing Skeleton Hands
Follow these steps to create a basic skeleton hand drawing:
- Sketch the overall shape of the hand using light, loose lines.
- Divide the hand into sections: wrist, palm, and fingers.
- Draw the carpals, metacarpals, and phalanges, ensuring proper proportions.
- Add details such as joints and knuckles.
- Refine your drawing by adding shading and texture.
Tips for Proportions
Proper proportions are crucial when drawing skeleton hands. Here are some tips to help you get it right:
- The length of the palm is roughly equal to the length of the middle finger.
- The thumb is shorter than the other fingers and attaches to the palm at a different angle.
- The index finger is usually the longest, followed by the middle finger, ring finger, and little finger.
Adding Details to Your Skeleton Hand Drawings
Shading Techniques
Shading is an essential part of creating realistic skeleton hand drawings. Here are some techniques to try:
Read also:Olivia Rodrigo Deepfake Unveiling The Truth Behind The Controversy
- Hatching: Parallel lines drawn closely together to create shading.
- Cross-hatching: Layers of hatching at different angles to add depth.
- Stippling: Small dots used to create shading and texture.
Texture and Surface Details
To make your skeleton hand drawings more realistic, pay attention to the texture of the bones. Use reference images to study the surface details of each bone, such as ridges, grooves, and smooth areas.
Practice Exercises to Improve Your Skills
Drawing from Life
One of the best ways to improve your skeleton hand drawing skills is to practice drawing from life. Use your own hand or a model's hand as a reference, and focus on capturing the skeletal structure beneath the skin.
Copying Masterpieces
Copying drawings or paintings by master artists can help you develop your skills. Choose works that feature detailed skeleton hand drawings and try to replicate them as closely as possible.
Exploring Different Styles of Skeleton Hand Drawing
Realistic vs. Stylized
There are two main styles of skeleton hand drawing: realistic and stylized. Realistic drawings aim to capture the exact anatomical structure of the hand, while stylized drawings allow for more creative freedom and interpretation.
Experimenting with Mediums
Try experimenting with different mediums, such as charcoal, ink, or digital tools, to see how they affect your skeleton hand drawings. Each medium offers unique opportunities for expression and creativity.
Advanced Tips for Realistic Drawings
Studying Anatomy
The more you know about human anatomy, the better your skeleton hand drawings will be. Study reference materials, such as anatomy books or online resources, to deepen your understanding of the skeletal structure of the hand.
Using Reference Images
Reference images are invaluable for improving your drawing skills. Use high-quality images of skeleton hands to study the details and proportions of each bone.
Common Mistakes to Avoid
Incorrect Proportions
One of the most common mistakes in skeleton hand drawing is incorrect proportions. Always double-check the length and positioning of each bone to ensure accuracy.
Overworking the Drawing
Another common mistake is overworking the drawing by adding too much detail or shading. Remember that less is often more when it comes to art.
Using Software for Digital Skeleton Hand Drawing
Popular Digital Tools
If you prefer digital art, there are several software options available for skeleton hand drawing:
- Adobe Photoshop
- Procreate
- Corel Painter
Advantages of Digital Drawing
Digital drawing offers several advantages, including the ability to easily undo mistakes, experiment with different brushes and textures, and save your work in various file formats.
Finding Inspiration for Your Art
Exploring Art History
Art history is full of examples of skeleton hand drawing. Study the works of artists such as Leonardo da Vinci and Michelangelo to gain inspiration for your own creations.
Connecting with Other Artists
Joining online communities or attending art workshops can help you connect with other artists and share ideas and techniques. Don't be afraid to ask for feedback on your work and offer constructive criticism to others.
Conclusion
In conclusion, skeleton hand drawing is a fascinating art form that requires a deep understanding of human anatomy and a willingness to practice and improve. By following the tips and techniques outlined in this article, you can create realistic and detailed drawings that showcase your artistic skills. Remember to always study reference materials, practice regularly, and seek inspiration from other artists.
We encourage you to leave a comment below sharing your thoughts on this article or any tips you have for skeleton hand drawing. Don't forget to share this article with your fellow artists and explore other articles on our site for more creative inspiration!